After releasing Spring Cloud Sleuth as a part of Brixton RC1 we have just released a version 1.0.4 of AccuREST. We’ve fixed a couple of bugs but we’ve introduced a couple of big features including:
- Maven plugin support
- Stub Runner functionality
This post will describe the latter feature in more depth.
Introduction
I’ve given quite a few talks about the library called Micro-Infra-Spring where I presented how you can profit from the Stub Runner functionality. Since my leaving the company owning that repository, the project is almost not maintained at all. For quite a long time any development was done mostly by me and actually I was the author of most of the Stub Runner’s code. Due to the aforementioned and the fact that Stub Runner is tightly coupled with AccuREST’s stub generation feature I’ve decided to migrate it to the AccuREST’s repository.
AccuREST recap
Stub Runner is tightly coupled with the concepts coming from AccuREST. For more information about AccuREST you can check my blog entries or check AccuREST project on Github. If you don’t have a clue what that is I’ll try to do a very fast recap.
AccuREST is a Consumer Driven Contracts verifier in which you define the contract of your API via a Groovy DSL. From that DSL, on the server side, tests are created to check if your contract is telling the truth. From the Stub Runner’s perspective more interesting is the client side. For the client side AccuREST generates WireMock stubs from the provided DSL so that the clients of that API can be provided with reliable stubs.
What is Stub Runner?
Now that we remember what AccuREST does we can take a look in more depth at Stub Runner. Let’s assume that we have a following flow of services (btw. this is a screenshot from Zipkin integrated with Spring Cloud Sleuth )
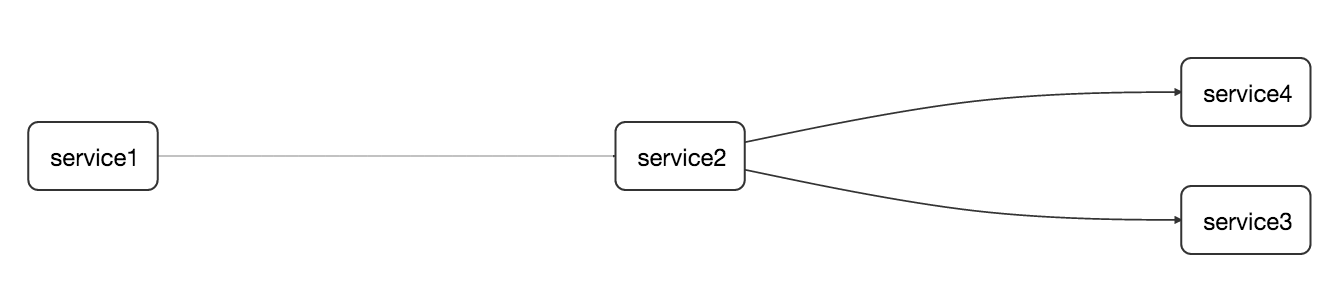
Let’s imagine ourselves as developers of the service2 - the one that calls service3 and service4. Since we’re doing the CDC (Consumer Driven Contracts) approach let’s assume that the stubs of service3 and service4 got already deployed to some Maven repository.
If I’m writing integration tests of service2 I’ll for sure have some points of interaction with service3 and service4. Most likely in the majority of cases I’ll just mock those interactions in my code but it would be valuable to have a real HTTP call done to the other application. Of course I don’t want to download both services and run them only for integration tests - that would be an overkill. That’s why the most preferable solution at this point would be to run the stubs of my collaborators.
Since I’m too lazy to do things manually I’d prefer the stubs to be automatically downloaded for me, the WireMock servers started and fed with the stub definitions.
And that’s exactly what Stub Runner can do for you!
How does it work?
Concept
Stub Runner at its core is using Groovy’s Grape mechanism to download the stubs from a given Maven repository. Next it unpacks them to a temporary folder. Let’s assume that you have the following structure of your WireMock stubs inside the stub JAR (example for a service3-stubs.jar)
├── META-INF
│   └── MANIFEST.MF
└── mappings
    └── service3
        ├── shouldMarkClientAsFraud.json
        ├── notAWireMockMapping.json
        └── shouldSayHello.json
Stub Runner will scan the whole unpacked JAR for any .json files. There is a convention that stub definitions are placed under the mappings folder. So it will pick shouldMarkClientAsFraud.json, notAWireMockMapping.json and shouldSayHello.json files.
Next, a WireMock instance is started for each dependency and every found JSON is attempted to be parsed as a WireMock stub definition. Any exceptions at this point are ignored (so assuming that notAWireMockMapping.json is not a valid WireMock definition, the exception will be suppressed). In our scenario 2 WireMock servers will be started - one for service3 and one for service4.
That way you don’t have to copy the stubs manually. The stubs are centralized since they are stored in a Maven repository. It’s extremely important cause Stub Runner downloads always the newest version of the stubs so you can be sure that your tests will break the moment someone does an incompatible change.
API
From the developer’s perspective there are only a handful of Stub Runner’s classes that should be used. In the majority of cases you will use the following ones:
StubFinder
An interface that allows you to find the URL of the started WireMock instance. You can find that URL by
passing the Ivy notation (groupId:artifactId) or just the artifactId - Stub Runner will try to take care of the rest.
interface StubFinder {
  /**
   * For the given groupId and artifactId tries to find the matching
   * URL of the running stub.
   *
   * @param groupId - might be null. In that case a search only via artifactId takes place
   * @return URL of a running stub or null if not found
   */
  URL findStubUrl(String groupId, String artifactId)

  /**
   * For the given Ivy notation {@code groupId:artifactId} tries to find the matching
   * URL of the running stub. You can also pass only {@code artifactId}.
   *
   * @param ivyNotation - Ivy representation of the Maven artifact
   * @return URL of a running stub or null if not found
   */
  URL findStubUrl(String ivyNotation)

  /**
   * Returns all running stubs
   */
  RunningStubs findAllRunningStubs()
}
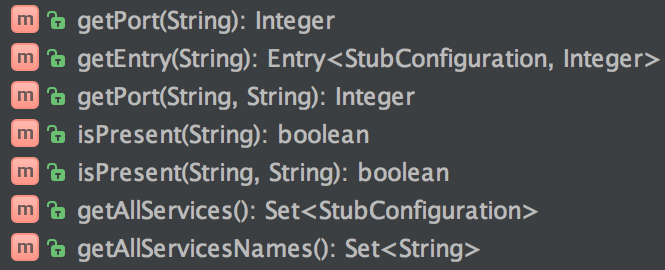
RunningStubs
A structure representing the already running stubs. Give you some helper methods to retrieve Ivy representation of a particular stub, find a port for a stub etc.
StubRunning
A contract for classes that can run the stubs:
interface StubRunning extends Closeable, StubFinder {
  /**
   * Runs the stubs and returns the {@link RunningStubs}
   */
  RunningStubs runStubs()

}
StubRunner
Represents a single instance of ready-to-run stubs. It can run the stubs and will return the running instance of WireMock wrapped in RunningStubs class. Since it’s implementing StubFinder can also be queried if the current groupid and artifactid are matching the corresponding running stub.
BatchStubRunner
If you have multiple services for which you want to run the WireMocks with stubs it’s enough to use BatchStubRunner. It iterates over the given Iterable of StubRunner and executes the logic on each of them.
Running Stub Runner
In all the examples below let’s assume that the stubs are stored in the Maven repository available under https://toomuchcoding.com URL. As service2 I’d like to download the stubs of com.toomuchcoding:service3 and
com.toomuchcoding:service4 services.
Stub Runner as a fat JAR
How to use it?
Stub Runner comes with a main class (io.codearte.accurest.stubrunner.StubRunnerMain) which you can run with the following options:
 -maxp (--maxPort) N            : Maximum port value to be assigned to the
                                  Wiremock instance. Defaults to 15000
                                  (default: 15000)
 -minp (--minPort) N            : Minimal port value to be assigned to the
                                  Wiremock instance. Defaults to 10000
                                  (default: 10000)
 -s (--stubs) VAL               : Comma separated list of Ivy representation of
                                  jars with stubs. Eg. groupid:artifactid1,group
                                  id2:artifactid2:classifier
 -sr (--stubRepositoryRoot) VAL : Location of a Jar containing server where you
                                  keep your stubs (e.g. https://nexus.net/content
                                  /repositories/repository)
 -ss (--stubsSuffix) VAL        : Suffix for the jar containing stubs (e.g.
                                  'stubs' if the stub jar would have a 'stubs'
                                  classifier for stubs: foobar-stubs ).
                                  Defaults to 'stubs' (default: stubs)
 -wo (--workOffline)            : Switch to work offline. Defaults to 'false'
                                  (default: false)
You can run that main class from IDE or build yourself a fat JAR. To do that just call the following command:
./gradlew stub-runner-root:stub-runner:shadowJar -PfatJar
Then inside the build/lib there will be a fat JAR with classifier fatJar waiting for you to execute.
Coming back to our example once the fat JAR is built I would just call the following command the retrieve the stubs of service3 and service4 from the Maven repository available at https://toomuchcoding.com.
java -jar stub-runner-1.0.4-SNAPSHOT-fatJar.jar -sr https://toomuchcoding.com -s com.toomuchcoding:service3:stubs,com.toomuchcoding.service4
When to use it?
Running Stub Runner as a main class makes most sense when you’re running some fast smoke tests on a deployed application where you don’t want to download and run all the collaborators of that application. For more rationale behind such an approach you can check my article about Microservice Deployment
Stub Runner JUnit Rule
How to use it?
You can use the Stub Runner’s JUnit rule to automatically download and run the stubs during your tests. The AccurestRule implements the StubFinder interface thus you can easily find the URLs of the services that you’re interested in.
This is how you could do it with Spock:
class SomeSpec extends Specification {

  @ClassRule @Shared AccurestRule rule = new AccurestRule()
      .repoRoot('https://toomuchcoding.com')
      .downloadStub("com.toomuchcoding", "service3")
      .downloadStub("com.toomuchcoding:service4")

  def 'should do something useful when service3 is called'() {
        given:
            URL service3Url = rule.findStubUrl('com.toomuchcoding', 'service3')
        expect:
            somethingUseful(service3Url)
    }

  def 'should do something even more useful when service4 is called'() {
        given:
            URL service4Url = rule.findStubUrl('service4')
        expect:
            somethingMoreUseful(service4Url)
    }
}
or with plain Java JUnit:
public class SomeTest {

  @ClassRule public static AccurestRule rule = new AccurestRule()
      .repoRoot("https://toomuchcoding.com")
      .downloadStub("com.toomuchcoding", "service3")
      .downloadStub("com.toomuchcoding:service4");

  @Test
  public void should_do_something_useful_when_service3_is_called() {
        URL service3Url = rule.findStubUrl("com.toomuchcoding", "service3");

        somethingUseful(service3Url);
  }

  @Test
  public void should_do_something_even_more_useful_when_service4_is_called() {
        URL service4Url = rule.findStubUrl("service4");

        somethingMoreUseful(service4Url);
  }
}
When to use it?
You can use this rule in any place you want to if we don’t provide any integration with an existing framework.
Stub Runner Spring
How to use it?
You can use the Stub Runner’s Spring configuration to download the stubs of your collaborators and run the WireMock server upon Spring context booting. We’re providing the StubRunnerConfiguration that you can import in your tests. In that configuration we’re registering a StubFinder bean that you can autowire in your tests.
Having the following application.yaml file:
stubrunner.stubs.repository.root: https://toomuchcoding.com
stubrunner.stubs.ids: com.toomuchcoding:service3:stubs,com.toomuchcoding.service4
This is how you could do it with Spock
@ContextConfiguration(classes = Config, loader = SpringApplicationContextLoader)
class StubRunnerConfigurationSpec extends Specification {

  @Autowired StubFinder stubFinder

  def 'should do something useful when service3 is called'() {
      given:
          URL service3Url = stubFinder.findStubUrl('com.toomuchcoding', 'service3')
      expect:
          somethingUseful(service3Url)
  }

  def 'should do something even more useful when service4 is called'() {
      given:
          URL service4Url = stubFinder.findStubUrl('service4')
      expect:
          somethingMoreUseful(service4Url)
  }

  @Configuration
  @Import(StubRunnerConfiguration)
  @EnableAutoConfiguration
  static class Config {}

}
When to use it?
In your tests if you have Spring and don’t have Spring Cloud. Also you can add it in compile time (of course you would have to add some Spring profiles so as not to run it on production) to profit from a “developer” mode of running microservices. That means that if you boot up your application to click around it - all the stubs around you would have already been downloaded and started.
Stub Runner Spring Cloud
How to use it?
You can use the Stub Runner’s Spring Cloud configuration to profit from the stubbed collaborators when using Spring Cloud’s abstractions over service discovery and when you’re using Netflix Ribbon. Stub Runner Spring Cloud configuration is an AutoConfiguration so it’s automatically started for you.
Let’s assume that you’re referring to service3 as service3 in your code and to service4 as shouldMapThisNameToService4. That means that you’re using for example the @LoadBalanced RestTemplate in the following way (don’t use field injection as I do in this example!!):
@Component
class SomeClass {

  @Autowired @LoadBalanced RestTemplate restTemplate

  void doSth() {
    // code...
    String service3Response = restTemplate.getForObject('https://service3/name', String)
    String service4Response = restTemplate.getForObject('https://shouldMapThisNameToService4/name', String)
    // more code...
  }

}
If the service Id that you’re using to call other services maps exactly to the name of the artifact Id in a Maven repository then you’re lucky and don’t have to do anything to find your running stubs. If however that’s not the case - don’t worry, you’ll just have to map it yourself.
The stubrunner.stubs.idsToServiceIds property is the root path to a map in which the key is the artifactID of the downloaded stub and the value is the serviceId used in the code.
Having the following application.yaml file:
stubrunner.stubs.repository.root: https://toomuchcoding.com
stubrunner.stubs.ids: com.toomuchcoding:service3:stubs,com.toomuchcoding.service4

stubrunner.stubs.idsToServiceIds:
  service4: shouldMapThisNameToService4
This is how you could do it with Spock
@ContextConfiguration(classes = Config, loader = SpringApplicationContextLoader)
class StubRunnerConfigurationSpec extends Specification {

  @Autowired SomeClass someClass

  def 'should not explode'() {
      when:
          someClass.doSth()
      expect:
          noExceptionThrown()
  }

  @Configuration
  @EnableAutoConfiguration
  static class Config {}

}
When to use it?
When you’re using Spring Cloud. You can profit from Stub Runner Spring Cloud also in “developer” mode as presented in the Stub Runner Spring section.
Additional Configuration Options
You can set the default value of the Maven repository by means of a system property:
-Dstubrunner.stubs.repository.root=https://your.maven.repo.com
The list of configurable properties contains:
| Name | Default value | Description |
|---|---|---|
| stubrunner.port.range.min | 10000 | Minimal value of a port for a WireMock server |
| stubrunner.port.range.max | 15000 | Maximum value of a port for a WireMock server |
| stubrunner.stubs.repository.root | Address to your M2 repo (will point to local M2 repo if none is provided) | |
| stubrunner.stubs.classifier | stubs | Default classifier for the JARs containing stubs |
| stubrunner.work-offline | false | Should try to connect to any repo to download stubs (useful if there’s no internet) |
| stubrunner.stubs | Default comma separated list of stubs to download |
Summary
Stub Runner:
- Has already proven to be a very useful tool when doing CDC.
- Was battle tested and more companies are declaring their interest in using it.
- Helps you produce an API that should make both sides (server and the client) equally happy (or unhappy but still they’re both equal in their emotions ;) ).
- Is language / technology agnostic - you can run it as a fat JAR, use it with Spring, Guice or whatever you want.
- Helps you speed up the feedback cycle both from the API design and the compatibility perspective.